The Image Menu in the GIMP contains tools for manipulating the entire image in some way. These tools can be applied to the current image or active layer or a specific selection on the image. The image menu contains the following tools:
- Duplicate
- Mode
- Precision
- Color Management
- Transform
- Canvas Size
- Fit Canvas to Layers
- Fit Canvas to Selection
- Print Size
- Scale Image
- Crop to Selection
- Crop to Content
- Slice Using Guides
- Zealous Crop
- Merge Visible Layers
- Flatten Image
- Align Visible Layers
- Guides
- Configure Grid
- Image Properties
- Metadata
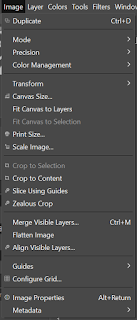
Let's understand each tool in detail:
Duplicate
The Duplicate tool is used to create a current copy of the image. It copies the exact image with all of its layers, channels, and paths without affected the clipboard and history. To duplicate an image, select the duplicate option from the Image menu or stroke the CTRL+D keys. The duplicate image will be opened in a new window.
Mode
The Mode tool is used to change the color mode of the image. There are the following three modes are available in GIMP:
- RGB
- Gray Scale
- Indexed
To select a mode, select the mode option in the Image menu.
The RGB tool converts image into RGB color options.
The Gray Scale tool converts the image in Gray Scale color options.
The Indexed tool converts the image in indexed color options.
Below is the example of all the above three modes:

Precision
The tool is used to change the precision of the image. Precision defines the quality, condition, and fact for being accurate. This tool affects the precision and channel encoding, which is used to store the image in RAM during processing.
The Precision sub-menu contains the following tools:
- 8-bit integer
- 16-bit integer
- 32-bit integer
- 16-bit floating integer
- 32-bit floating integer
- Perceptual gamma (sRGB)
- Linear Light
To select any of the above precision tools, select it from the image-> Precision menu. It offers some integer, floating precision options, and channel encoding options.
Color Management
The Color Management tools are used to change the ICC color profile associated with an image. Further, it allows us to save the associated ICC color profile to disk. There are the following options available in the Color Management submenu.
- Enable Color Management
- Assign Color Profile
- Convert to Color Profile
- Discard Color Profile
- Save Color Profile to File

Enable Color Management: This tool allows us to assigns a GIMP built-in sRGB color space to our image.
Assign Color Profile: This tool is used to assign a new ICC profile to an image.
Covert to Color Profile: This tool is used to transform an image from its current color profile to another profile.
Discard Color Profile: This tool is used to disable the image's currently assigned color profile.
Save Color Profile to File: This tool is used to save to disk a copy of the ICC profile that's assigned to our image.
Transform
The Transform tool is used to transform the image by flipping it, rotating it, or cropping it. The transform sub-menu provides the following options:
- Flip Horizontally
- Flip Vertically
- Rotate 90 degrees clockwise
- Rotate 90 degrees counter-clockwise
- Rotate 180 degree
- Arbitrary Rotation
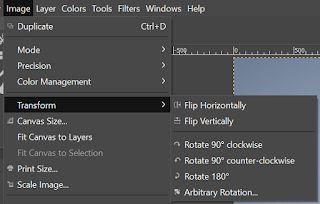
To use any of the above transformations, select it from the image-> transform menu.
Canvas Size
It is the entire visible area of the image. By default, it coincides with the layer's size. The canvas size can be resized by using this option.
The canvas size tool opens a window for defining and reducing the canvas size.
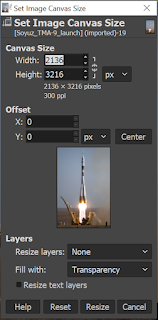
Reducing the image size causes the new canvas to be surrounded by the image. We can adjust the image with this frame by clicking and dragging on the image against this frame.
Fit Canvas to Layers
It is used to accept the canvas size to the size of the most significant layer in the image. When we create a new image, the canvas size will be the same as the image size. It will not change if new layers are added. If we want to add a more substantial layer than the image size, we have to use it to show the whole layer.
To use this tool, select it from the image menu.
Fit Canvas to Selection
It is used to adapt the canvas size to the size of the current image. It will adjust the image in both width and height aspects.
To fit the canvas to the selection, select this tool from the Image menu.
Print Size
The Print Size tool is used to change the dimension of a printed image and its resolution. It opens a window for specifying the image print resolution; It does not affect the image pixel or resamples it. For resampling, the image, use the scale option from the Image menu.

Scale Image
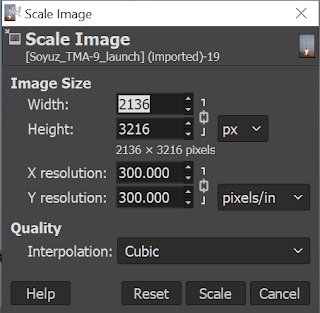
The scale image option is used to enlarge or reduce the size of the image in the number of pixels. It changes the size of the image cont it applies to the entire image. To scale an image, select the scale image option from the Image menu. It will open a window asking the new size of the image.
Crop to Selection
The Crop to selection tool is used to crop the image from the selection. The partially selected areas will not be cropped. If the selection is feathered, the crop operation will be performed on the external feathered area. If there is no selection, this option will be disabled and grayed out.
To crop a selection, create a selection, and select the Crop to selection option from the Image menu.
Crop to Content
It is used to eliminate the borders from an image. In the earlier version of the GIMP, it was named "Autocrop image." It searches for the significant area of the same color in the image and crops it. It works like a traditional crop tool.
To use this tool, select it from the image menu.
Slice Using Guides
It is used to slice up the current image based on the image's guides. It crops the image according to the guide. It is a similar guillotine which is also known as an image cutter.
To use this tool, select it from the image menu.
Zealous Crop
It is used to crop an image using a single solid color as a guide. It is similar to the Auto crop tool, but it also crops the image's middle area with the same color.
To use this tool, select it from the image menu.
Merge Visible Layers
The Merge, Visible Layers tool, is used to merge the layers into a single layer. There are two types of layers in GIMP that are visible and hidden. A layer can be set as visible or hide by clicking on an eye icon on the layer.

To merge visible layers, select the option from the Image menu or stroke the CTRL+M keys.
Flatten Image
It is used to merge all of the image layers into a single layer with no transparency. The image will have the same appearance as it had before after the flattened image. But, it keeps all of the image contents are in a single layer without transparency. It makes remarkable changes to the entire structure of the image.
To use this tool, select it from the image menu.
Align Visible Layers
The Align Visible Layers tool is used to position the visible layers. It is useful when working on animations having many small layers. It displays a dialog for choosing the alignment of the layers.
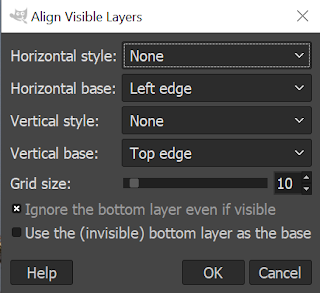
To use this tool, select it from the image menu.
Guides
It consists of several commands for removing and adding the guides. It contains the following tools:
- New Guide (by Percentage)
- New Guide.
- New Guides From Selection
- Remove all Guides

Configure Grid
The Configure Grid allows us to set the properties of the grid used to display over our image while working on it. It facilitates only Cartesian grids.
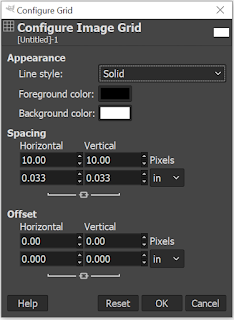
Image properties
The image properties tool is used to display additional information about the image, such as the size of the image, undo and redo steps applied to the image, and many more.


